If you have always wanted to learn how to sharpen a hatchet with a whetstone but never got a chance for it, now is the right time. In this article, you will be able to read step-by-step instructions on how to sharpen your hatchet with a whetstone in the simplest and most effective way.
So, if this sounds like the type of information you have been searching for for a long time, let’s jump straight on to the main topic.
How to Sharpen a Hatchet With a Whetstone
Learning how to sharpen a hatchet with a whetstone does not have to be a complicated and difficult thing to do. All you will need is good instructions, which you will get in this article, and a little time and patience. Then, with some practice, you will be able to do this on your own each time you feel like your hatchet is not as sharp as you would prefer it to be.
Before I continue onto the actual steps, I would also like to mention that if your hatchet is dull and not sharpened enough, it might represent a great threat and danger to your safety. Therefore, ensure to sharpen your hatchet with a whetstone on a regular basis so that you avoid any unpleasant and unwanted consequences.
That said, let’s look at the instructions on how to sharpen a hatchet with a whetstone that I have prepared especially for you.
Prepare the whetstone
Before you start with the actual process of sharpening your hatchet, the first thing you will need to do is prepare the whetstone. You can soak or immerse it in water for some time so that it performs optimally. As the water acts as a lubricant for the whetstone, it will help it to work better and more effectively. Doing this will also help ease the hatch-sharpening process itself, as well as remove any swarf that might be on the cutting path on the surface.
Although this might sound simple, you must always carefully follow the instructions with your whetstone to ensure the best possible care for it. Some whetstones require soaking in water, others in oil, and some do not require any pre-preparation at all.
Read more: What Is Batoning With a Knife?
Hold the hatchet in the right position
After you have prepared the whetstone and it is ready to use, you might continue to the next step – positioning your hatchet right. The position of the hatchet plays a key role in successful and danger-free sharpening.
The right way to position and hold your hatchet while sharpening is to hold it in the way that you place the haft of the hatchet over your left shoulder while the cutting edge is pointed skywards. With this position, you will be able to sharpen the left side of your hatchet.
Another way you can position your hatchet is to place it flat on the ground or on a benchtop. If you use a benchtop, you must consider that you need to fix the hatchet in place with a clamp or fixture so that it stays in place while you perform the sharpening.
Finally, if you are using a smaller whetstone, you will need to secure the hatchet with a C-shaped type of clamp so that it fixes the hatchet near the end of your workspace in a way that the edge is exposed so that you can move the whetstone over it.
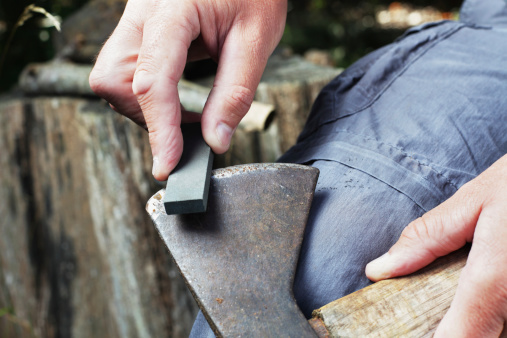
Perform the sharpening
After you are all set and the hatchet is positioned and ready, it is time to move to sharpen it. You might want to consider keeping a bucket of water or oil, as requested so that you can immerse the whetstone in it for more effective sharpening.
With your left hand, or if you are left-handed, just change sides, and hold the hatchet tightly in one place. Then, take the pre-prepared whetstone in your dominant hand and start performing the sharpening while you hold the whetstone in a ten to twelve-degree angle position. Start by first sharpening one side of the hatchet and then continue to the other side of the cutting edge.
Try to make equal movements by pushing the whetstone across the entire edge of your hatchet from the back to the front and vice versa.
Read more: What Is a Gimlet Tool?
How long should the sharpening process last
Once you start performing the sharpening, different hatches will take different times to be fully sharpened and ready for use. One factor that mainly impacts the time of the sharpening process is the dullness of the hatchet’s edge. The duller its edge, the longer it will take to sharpen again fully.
Another factor that impacts the longitude of the sharpening process is the whetstone itself. Depending on whether the whetstone is more or less aggressive, the sharpening process will last longer or shorter.
For instance, a regular hatchet needs about twenty to forty strokes on one side before continuing to sharpen the other side. You can start with a smaller number of strokes and simultaneously flip the sides until the edge is as sharp as possible.
Finally, you must ensure that your tools and grip are safe to protect yourself from unwanted harm.
Finish the edge
Once you have made the hatchet’s edge as sharp as a razor, you will need to blunt it out a little bit. The reason behind this is a too-sharp hatchet edge can be easily damaged or rolled. Therefore, to avoid any potential breakage or malfunction, you need to go over both sides of the edge with fine and coarse stones, but this time at a fifteen-degree angle. You will need to do these movements about half a time less than you did while sharpening the hatchet.
For instance, if you used about forty strokes for sharpening, you will need about twenty strokes to finish the edge.
Read more: How to Build a Hut in the Woods
Conclusion
In this article, you could have read how to sharpen a hatchet with a whetstone in the most simplistic and effective way possible. By practicing this process and doing it regularly, I do not doubt that you will become a professional in it in no time, and you will need only a few minutes to fully sharpen it and make it ready to use.