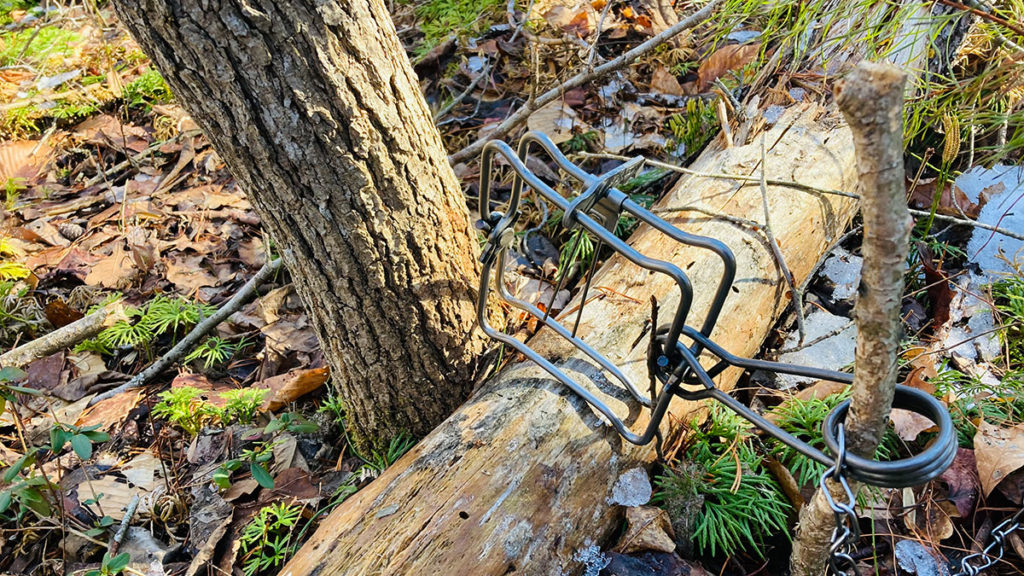
Conibear traps are body traps constructed with two rectangular frames. When the prey gets caught by a conibear trap, it may fatally crush its skull or break its vertebrae. It is lightweight and small, excellent for being part of the survival backpack.
But do you know how to set conibear traps?
Knowing how to set a trap is crucial because it might be dangerous and result in breaking a finger. So, this guide will focus on the steps one should take when placing a conibear trap.
How to Set Conibear Traps
The first step is to find a suitable trap size and a good location for trapping prey. With the help of a trap-setting tool, compress the trap springs. Set the sensitivity of the trigger by choosing one of the locking mechanism notches. Secure the trap and place food in the middle.
If you don’t have a conibear trap, it is good to purchase one since it is compact and lightweight. You might see multiple available conibear trap sizes, so choose the one that might meet your needs, depending on what you are going to hunt.
Once you have chosen the conibear trap size, finding a matching trap-setting tool is best. Choosing too large or too small trap-setting tools might result in unsuccessful and risky trap-setting.
Advanced bush crafters can set a caliber trap using their hands protected with gloves, but we recommend you purchase a tool to avoid hurting yourself.
Step by Step: How to Set Conibear Traps
Step 1
Choose the right location
You can not place the trap anywhere and expect something to get trapped by passing by. Place it below the tree if you plan to hunt squirrels, set it near a pond if you aim to catch beavers, etc.
You can also place the conibear trap under shallow water if you aim to catch a water-living animal or a bigger animal that might drink water at night.
Step 2
Choose the right conibear trap size
Conibear traps are available in three sizes:
- The 110 conibear trap is for little prey like rabbits and squirrels
- The 220 conibear trap is for medium animals like raccoons
- The 330 conibear trap is for bigger animals like otters and beavers
Depending on your location, you can hunt different prey. Consider the size of the prey to choose the right conibear trap.
Also read: How to Set a Body Grip Trap
Step 3
Carefully set the trap
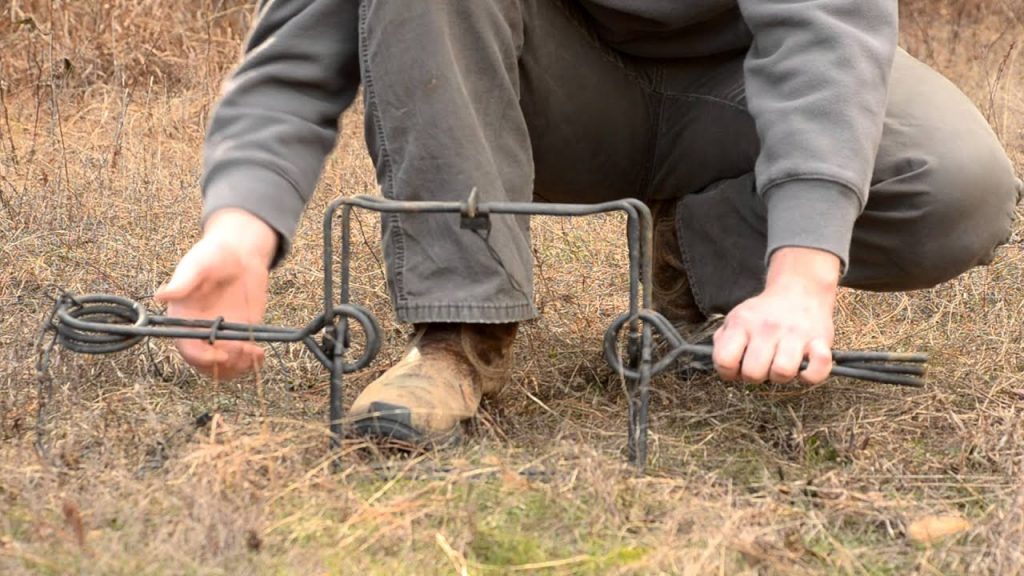
No matter how experienced you are; it is best to use trap-setting tools when placing the conibear trap.
Place the tool so it will hook to the holes at the end of the spring. Squeeze the ends of the tool until it compresses the springs. You can also keep the conibear trap in place by stepping on the end while compressing the spring.
Step 4
Position the J hook
The J hook is a thin J-looking hook that dangles from near the end when the spring is uncompressed. The pressure from this hook will hold the springs’ sides close, keeping the trap in a compressed position.
Be careful and consider pressing the trap-setting tool until the hook gets in place. Releasing the tool too early might result in springs popping open.
Step 5
Repeat the process on the other side
Some conibear traps have one spring, while others have two. If your trap has one spring, you can skip this step. Repeat the process with the other spring on the other side of the trap.
Slide the J hook until it hooks and holds the spring in a compressed position.
Step 6
Open the trap
When you set the springs, it is time to open the trap using the same setting tool. Catch the top bar of the trap and squeeze the setter tool to open the trap’s top.
The trap should look like a vertical rectangle.
Step 7
Set the sensitivity level
Once you open the trap, you should set the trap’s sensitivity. You can place the locking mechanism notches on the first, second, or third notch.
- The first notch nearest to the trap is the lowest sensitivity.
- The middle notch of the trap is medium sensitivity.
- The last, farthest notch of the trap is the highest sensitivity.
You manage the sensitivity level based on the animal size you want to hunt. Lighter animals can trigger the trap on the highest setting, while heavier animals can only trigger the trap on the lowest setting.
Step 8
Lock the trigger
The prolonged metal piece hanging down from the trap is the trigger. Fold the mechanism until one of the indentations gets over the groove in the middle of the trigger.
Step 9
Secure the trap
Shove a stick in the spring hole if the trap has one spring, or shove two sticks if it has two spring holes.
The stick should secure and hold the trap on the ground. It also prevents it from drowning in the mud or under the water if you place it in a pond or near a river.
Step 10
Release the hook/s
Remember the J hooks from step 4? Now is the time to release them because the trap is set, and we no longer need them.
With your fingers, slide the hooks away from the spring. Releasing the hooks will shut the trap once an animal steps on it.
Be careful when releasing the hooks because the trap might pop and hurt your hands.
Read more: How to Keep Bears Away From Camp
Conclusion
We hope these ten steps have helped you learn how to set conibear traps when lost in the wild. Practice setting a conibear trap before going on a trip. Sharpening your bushcraft skills will help you face a survival mission.
Don’t forget to share these tips with your adventure buddies. Doing things with two pairs of helping hands is much better.